
Chinese Tailor · Your measurement guide
Measure. Enter. Make it yours.
Follow one measurement at a time and enter your result beside the illustration. Review the figures, then bring them into checkout.
Your personal fit profile
Measurements for every qipao
Loading your measurement profile…
Save your measurements across devices and add private fit photos. You can also continue below as a guest; guest drafts stay in this browser for 30 days.
We save your entries to your account as you type. Before each new order, we will ask you to check whether your measurements need updating.
Body-shape photos · optional 0 of 3
Help our tailor understand your shape. Front, side, and back views in fitted everyday clothing work well. You may leave your face out.
Visible only to you and our authorized store team for tailoring. Photos are not published or included in order emails.
Before you start
- Use a soft tape measure and wear the underwear or bra you plan to wear with your dress.
- Stand naturally. Keep the tape flat, snug, and comfortable; do not add extra room.
- Use a mirror to check the tape. Ask a helper for your back length and shoulder width.
- Measure twice and check that both readings agree. Use the specific starting points in our illustrations.
Shoulder width is now measured on your body. Please remeasure it using the updated illustration. Your other saved measurements are still available.
Measurement 1 of 14 · Required
Height

- Stand barefoot with your back against a wall and look straight ahead.
- Place a flat book level on top of your head and mark the wall.
- Measure from the floor to the mark. Enter your height in feet and inches, or select centimeters above.
For example, enter 5 ft and 5 in. For a whole-foot height, enter 0 in. Ask a helper to mark the wall if possible.
Measurement 2 of 14 · Required
Neck

- Place the tape around your neck where the collar will sit, following the illustration.
- Keep your head upright and your shoulders relaxed.
- Let the tape lie flat against your skin without pulling it tight.
Enter the body measurement without adding extra room.
Measurement 3 of 14 · Required
Shoulder width
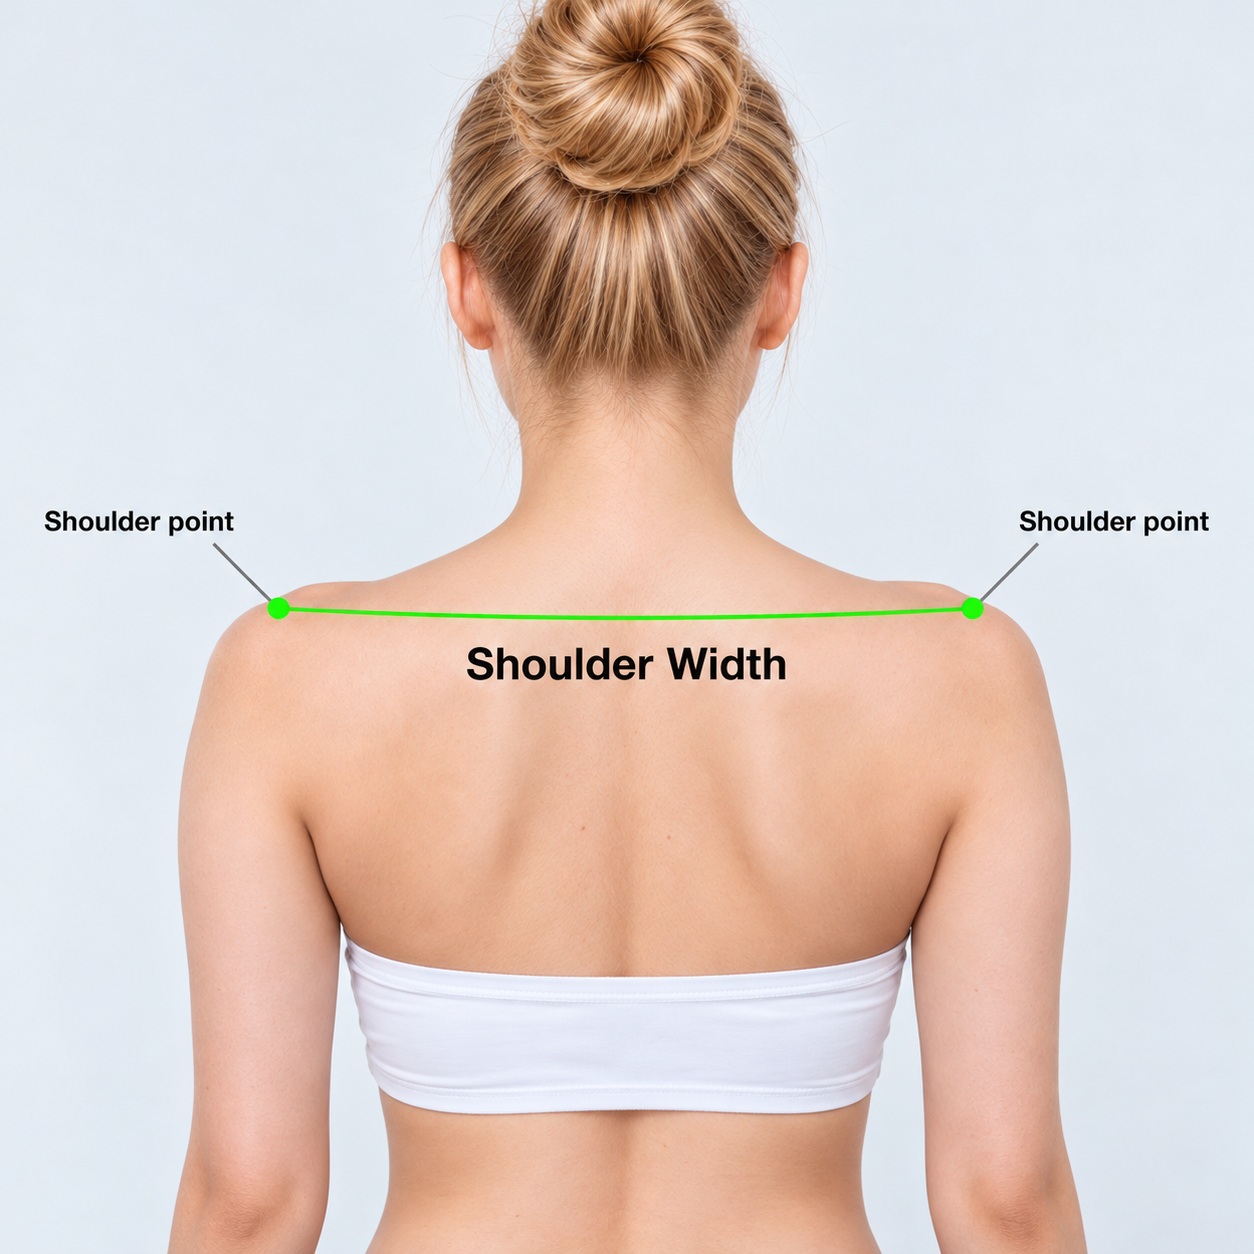
- Stand naturally with your arms relaxed at your sides and your shoulders level.
- Find the outermost bony tip of each shoulder (the acromion).
- Ask a helper to measure from one shoulder point to the other, straight across your upper back and following its natural curve.
Keep the tape flat against your skin without pulling it tight. Enter your body measurement without adding extra room.
Measurement 4 of 14 · Required
Bust

- Wear the bra you plan to wear with your qipao.
- Wrap the tape around the fullest part of your bust. Lower your arms and stand naturally.
- Check in a mirror that the tape is level across your back, then read the measurement.
This is a circumference measurement, not your bra size. Do not hold your breath or compress the bust.
Measurement 5 of 14 · Required
Bust points

- Find the fullest point of each breast while wearing your planned bra.
- Measure across the front from one bust point to the other.
- Record the distance between the two points, not a measurement around the body.
Keep the tape at bust-point level and follow the placement in the illustration.
Measurement 6 of 14 · Required
Shoulder to bust

- Find the top of your shoulder next to the base of your neck.
- Run the tape down the front to the bust point, following the illustration.
- Keep a natural posture and read the length without pressing the tape into your body.
Start at the shoulder near the neck, not at the outer tip of the shoulder. A helper makes the starting point easier to check.
Measurement 7 of 14 · Required
Waist

- Find your natural waistline, where your body creases when you bend gently to the side.
- Wrap the tape around that line and keep it level.
- Stand normally, breathe naturally, and read the tape without pulling it tight.
Tie a narrow ribbon around your natural waist to keep the same reference point for length measurements.
Measurement 8 of 14 · Required
Back length · shoulder to waist

- Mark your natural waistline with a narrow ribbon.
- Ask a helper to start at the shoulder seam position near the neck, as shown in our illustration.
- Measure down your back to the waistline while you stand straight and relaxed.
Use the starting point in this illustration. Back-length starting points can differ between general sewing tutorials.
Measurement 9 of 14 · Required
Hips

- Stand with your feet together and your weight evenly balanced.
- Wrap the tape around the fullest part of your hips and seat.
- Check that the tape stays level all the way around, then read the circumference.
Measure the fullest part of the seat, not the upper hip bones. A mirror helps you check the back of the tape.
Measurement 10 of 14 · Required
Thigh

- Stand naturally with the thigh relaxed.
- Wrap the tape around the thickest part of one upper thigh.
- Keep the tape flat and read the circumference without squeezing the leg.
Measure one thigh, not both legs together.
Measurement 11 of 14 · Required
Upper arm

- Relax your arm at your side.
- Wrap the tape around the thickest part of your upper arm.
- Read the circumference with the tape flat and without flexing or squeezing the muscle.
Required for your qipao, including sleeveless styles. This measurement will also be collected at checkout.
Measurement 12 of 14 · Required
Desired dress length

- Decide where you would like the finished hem to sit.
- Start at the lower collar-seam position and measure down to your chosen hem, following the illustration.
- For a long dress, wear the shoes you plan to wear with it when deciding the hem position.
This is a garment preference. Check it for the style you choose, then apply it on the dress page before adding to your cart.
Measurement 13 of 14 · Required
Desired sleeve length

- Find the shoulder seam point at the outer edge of your shoulder.
- Measure down your arm to where you would like the sleeve to end.
- Keep the arm relaxed with a slight bend if measuring a longer sleeve.
You may enter 0 for sleeveless. Check that the chosen dress style or customized details match your preference.
Measurement 14 of 14 · Required
Desired slit length

- Keep Tailor decided selected if you would like our tailor to choose the slit length.
- To specify a length, choose Enter my desired slit length and measure upward from the planned hem to the top of the slit.
- Record the length of the opening, not the distance from your waist. You may enter 0 if choosing No slit on the dress page.
Tailor decided is selected by default. You can enter a specific slit length instead, including 0 if choosing No slit on the dress page.
Check your measurements
Units: Inches. Changing the units above converts the figures you have entered.
Required body measurements
| Measurement | Your figure | Change |
|---|---|---|
| Height | Not entered | |
| Neck | Not entered | |
| Shoulder width | Not entered | |
| Bust | Not entered | |
| Bust points | Not entered | |
| Shoulder to bust | Not entered | |
| Waist | Not entered | |
| Back length · shoulder to waist | Not entered | |
| Hips | Not entered | |
| Thigh | Not entered | |
| Upper arm | Not entered |
Required dress measurements
Apply and check these dress measurements on the product page before adding a dress to your cart. For desired slit length, keep Tailor decided or enter a specific length. Saved choices do not change items already in your cart.
| Measurement | Your figure | Change |
|---|---|---|
| Desired dress length | Not entered | |
| Desired sleeve length | Not entered | |
| Desired slit length | Not entered |
Your measurements are ready. They will be available at checkout on this device. Please review them there before placing your order.
Your draft is saved on this device for 30 days. Use the same browser when shopping and checking out. Clear it when you finish on a shared device.
Clear the measurement draft saved on this device? Your existing orders will stay unchanged.